After a really long break, we finally have a new tutorial. Let’s take a look at a macrame yoga mat strap tutorial. The result shows that macrame not only looks beautiful, but can also be very practical. My yoga mat strap has been a companion for four years now and I wouldn’t want to miss it anymore.
The great thing is that the instructions are relatively simple, so it can also be a good project for beginners. Only at the beginning can the wrapping knot be a bit challenging, but as always I try to show it as clearly as possible in the pictures. Otherwise, you can also find more step-by-step explanations of all the common knots under knotting techniques.
Then let’s get started.
Macrame Yoga Mat Strap Tutorial
Materials
- approx. 24m cord, 3 or 4mm thick
- two rings made of wood or metal with a diameter of approx. 2cm
- scissors
- hot air glue gun or other liquid craft glue
Instruction
As we are all different sizes, the actual cord consumption will vary slightly. It also depends on whether you only want to wear the yoga mat over your shoulder or also on your back. For example, it was very important to me that my strap was long enough to carry the yoga mat on my back so that I could ride my bike with it. The good thing is that you can always check whether the strap is long enough while you are tying it.
In terms of the length of cord required, however, this means that it is better to plan with a little more than less. A good guideline is two cords of 10m length and two cords of 1.70m length. You will also need two 30cm long strands of cord.
If you end up with a lot of leftover cord, you don’t need to throw it away! Leftovers are always great for smaller projects such as macrame feathers.
We will only need two macrame knotting techniques: the wrapping knot (steps 3 to 7, steps 18 + 19) and the alternating Lark’s Head Knot (steps 8 to 14). Take a look at the linked pages if the following instructions are not enough for you. Every little detail is shown there.

1
Pass the four long pieces of cord through the ring so that about 6 cm overlap (blue). The two very long cords are on the outside, while the short ones are on the inside.

2

3
Now take one of the short 30cm cords (green) and place it in a U-shape over the folded cord ends as shown in the picture. We will now start with the wrapping knot.

4
Wrap the short cord from the back to the front around the folded cords.

5

6
Thread the end of the short cord through the loop. If this was too quick for you, you can find more detailed instructions for the wrapping knot here.

7
Then pull on the upper cord so that the lower part disappears into the knot. You can then simply cut off the two protruding cords.

8

9
Pull this loop tight and then take the same cord, this time passing it behind the two middle cords and then passing it forward over the two middle cords and behind itself.

10
Pull the loop tight again and the first Lark’s Head knot on the right side is finished. Then take the left cord, place it over the two middle cords from the front, then through to the back and over itself.

11

12
Pull the loop tight and the second Lark’s Head knot is complete.

13
Repeat steps 8 to 12 again and again so that you alternate the Lark’s Head knot on the right side…

14

15

16
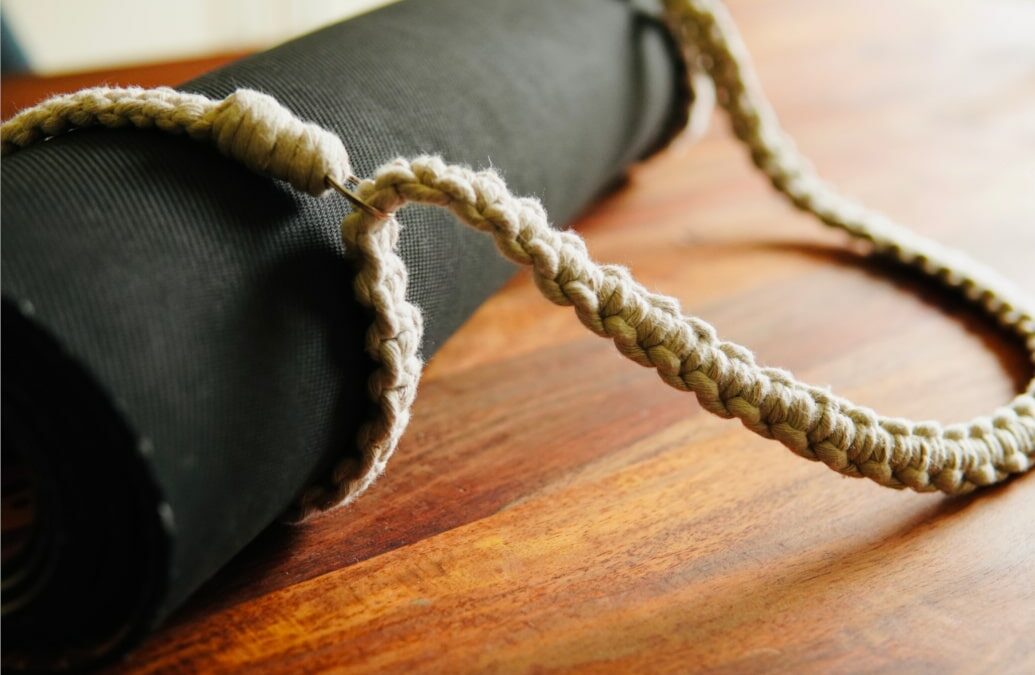
Take the end with the four loose cords (blue) and thread them through the ring to create your second loop.
Note: the cord ends (blue) are probably much longer. Don’t cut them off yet!

17
Tip: To check whether the length of the cord is right for you, you can roll up your yoga mat once and test the strap. Simply hold the unattached loop firmly or ask for help. If the cord is still too short, tie a few more double half loops.

18
Take the second short cord (or cut some of the four cords) and place it over the doubled strand again as shown in the picture. Repeat steps 4 to 7.

19
Cut off all the excess cords and this is what the end result of the second loop should look like.
Your macrame yoga mat strap is ready! Let me know in the comments if you were able to follow the instructions and if you like the new style of the pictures. Also, if you have any requests for further projects, please let me know!


0 Comments