Macrame Knots – Lark’s Head Knot

One of the macrame knots is the so-called Lark’s Head Knot – also known as the Cow Hitch Knot. You usually start a macrame project with the horizontal Lark’s Head Knot. However, there is also a vertical version, which you can use to tie beautiful strands.

Table of Contents

Lark’s Head Knot – Horizontal

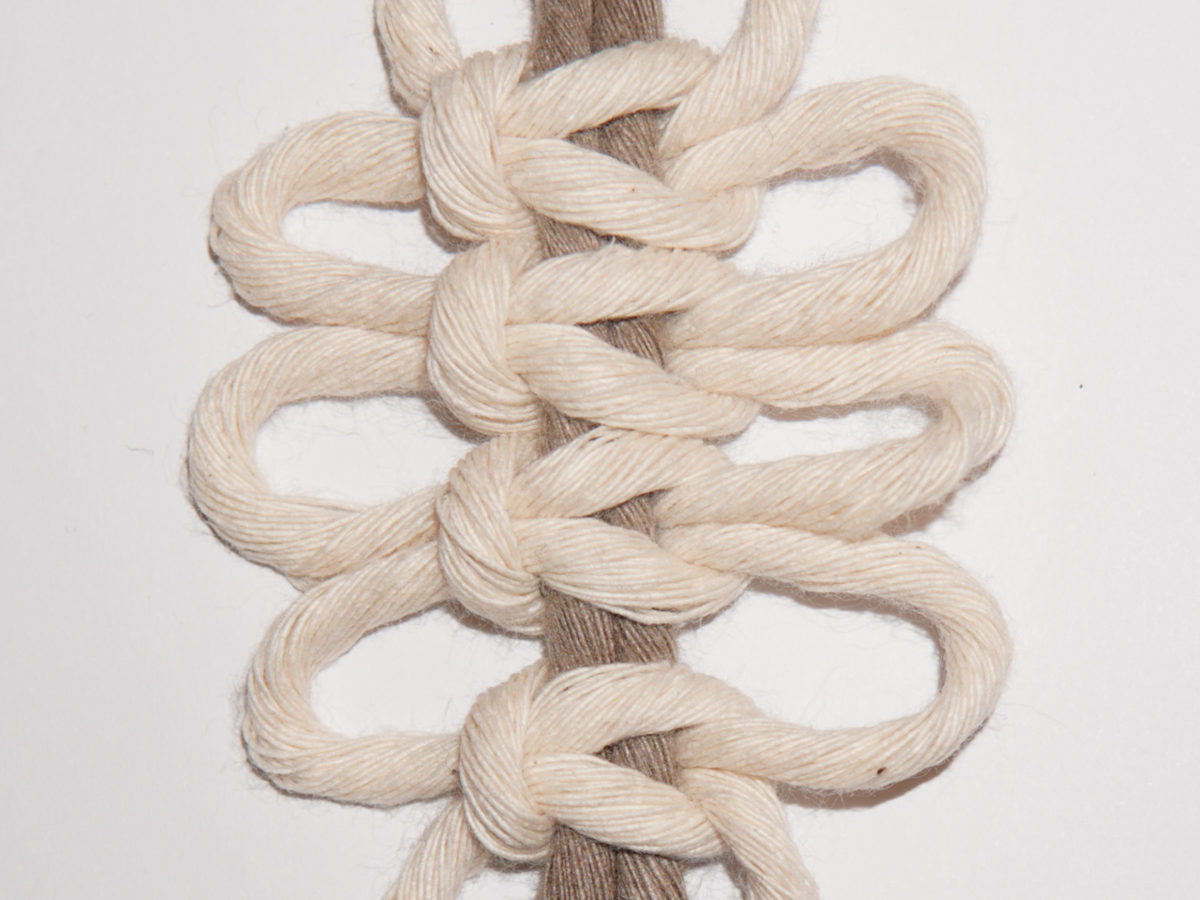
Lark’s Head Knot – Vertical

Lark’s Head Knot – Horizontal

This is usually the starting knot. You can use it to attach to rods or rings made of wood or similar. There are two different variants: The forward-facing and the reverse-facing variant. Which one you use depends on your personal preference. There is no right or wrong.

Forward-Facing

Schwere Feder Teil 1

1

Take a strand and double it to create a loop. Place this over a stick or other support.

Schwere Feder Teil 1

2

Then pass the loop around behind the rod.

Schwere Feder Teil 1

3

Now all you have to pull the two ends of the thread through the loop and you have a forward-facing Lark’s Head Knot.

Reverse-Facing

Schwere Feder Teil 1

1

Take another strand and double it to create a loop. However, do not lay this in front of the rod as in the forward-facing version, but behind it.

Schwere Feder Teil 1

2

In the second step, place the loop around the rod so that it is now at the front.

Schwere Feder Teil 1

3

Then pass the two ends of the cord through the loop from behind and you have a reverse-facing Lark’s Head Knot.

Alternating

The alternating Lark’s Head Knot is a mixture of the right-facing and the left-facing Lark’s Head Knot. Here you knot both variants alternately.
The filler cord in this example is also the brown strand. You can decide for yourself whether you want one or two filler cords. You work with the white strands, which are your alternating working cords.
It is not important which direction you start with. In this example, we start again with the Lark’s Head Knot facing to the right.

Schwere Feder Teil 1

1

The first step is to make the first loop for the knot pointing to the right. To do this, take the right working cord, place it over the filler cord and pass it upwards under the filler cord.

Schwere Feder Teil 1

2

The second step is to make the second loop for the knot pointing to the right. To do this, take the working cord, pass it under the filler cord and then back over the filler cord to the top.

Schwere Feder Teil 1

3

Then simply pull both loops tight and you have your right-facing Lark’s Head Knot.

Schwere Feder Teil 1

4

Now take the left working cord, place it over the filler cord and then upwards under the filler cord to create the first loop.

Schwere Feder Teil 1

5

Then pass the working cord under the filler cord and then up and over the filler cord.

Schwere Feder Teil 1

6

Tighten the two loops again. You now have the left-facing Lark’s Head Knot.

Schwere Feder Teil 1

7

You can now simply repeat these steps again and again until you have a strand.

Alternating with Picots

Just as with the square knot, you can also use picots for the Lark’s Head Knot. Once again, you can decide for yourself whether you want to use one or two filler cords and whether you want to start with the right-facing or left-facing version.

Schwere Feder Teil 1

1

As described above, you knot the right-facing Lark’s Head Knot.

Schwere Feder Teil 1

2

The second step is also nothing new. This time, you tie the left-facing Lark’s Head Knot.

Schwere Feder Teil 1

3

The third step is the crucial part. For the next knot, leave some space between it and the previous knots. The distance should be approximately twice as large as the desired size of the picots.

Schwere Feder Teil 1

4

Then hold the filler cord(s) and simply push the knot up. Now it’s the left side’s turn again. Again, leave about twice as much space between the knots as you want the picots to be.

Schwere Feder Teil 1

5

Hold the filler cord and push the knot upwards.

Schwere Feder Teil 1

6

You can simply repeat steps 3 to 5 as often as you like so that you end up with a beautiful strand.

That’s it! Now you know the common variations of the Lark’s Head Knot. If you don’t understand a step or have any further questions, feel free to write in the comments.

Have fun knotting!

0 Comments

Submit a Comment

Your email address will not be published. Required fields are marked *