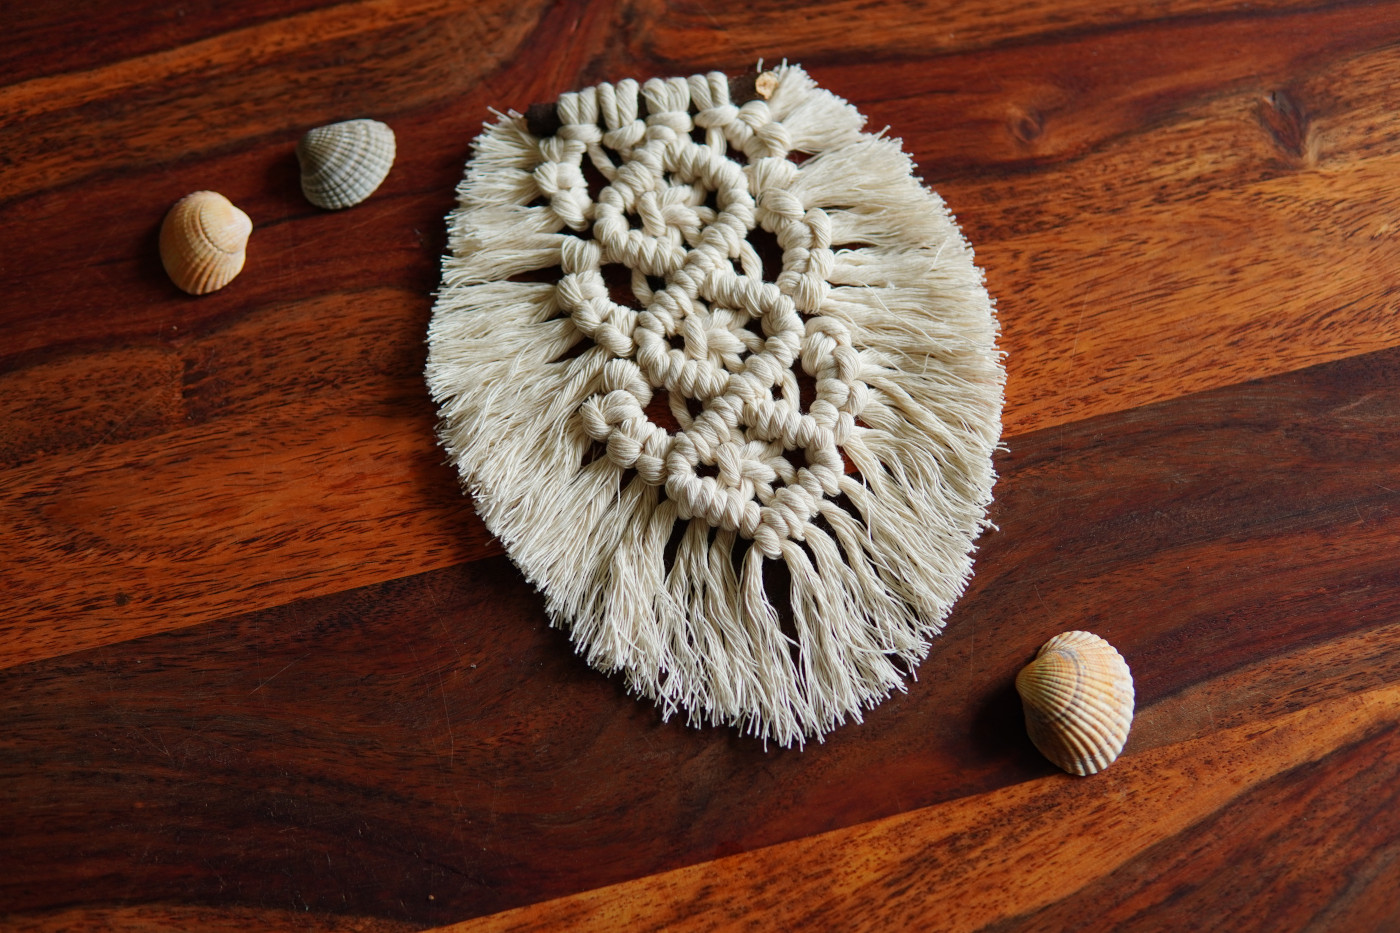
In the last post, I showed you two ways to make a macrame feather. This post is about this macrame feather, which is a real eye-catcher, but also involves a few more steps than the “normal” feathers.

This feather is a small wall hanging in itself, but you can also use it to decorate other wall hangings and give free rein to your creativity. You can also easily replace the square knots in the centre (steps 14 to 16, 24 and 29) with wooden beads by threading the middle two strands through the bead.

But enough preamble – now it’s time to knot!

Macrame Feather

Materials

  • cord 3mm
  • branch/stick
  • scissors
  • comb/fork

Instruction

The macrame feather will end up being approximatly 20cm long and 15cm wide. You will need 4x 150cm cords and 22x 15cm cords. You don’t need to cut the small ones to size yet, but can use the excess cords from the 150cm long cords once the basic structure is in place.

Only three knots are used for this feather: the Double Half Hitch knot, the square knot and the Lark’s Head Knot at the beginning and end. I would recommend that you open the knotting techniques page at the same time so that you can look up how the knot works if you need to. There I explain the individual knots step by step.

Makramee Yogagurt Schritt 1

1

We start with the four long cords and join them to the branch using the Lark’s Head Knot.

Makramee Yogagurt Schritt 1

2

Take the fifth cord from the left and place it over the front four. We will now make a Double Half Hitch knot around the fifth cord with all four strands. You can find a detailed explanation of the Double Half Hitch knot here.


Makramee Yogagurt Schritt 1

3

So you place the fourth cord from the left over the diagonal one. It is then threaded from behind between the diagonal one and itself.

Makramee Yogagurt Schritt 1

4

Tighten the knot and do exactly the same again with the fourth cord.

Makramee Yogagurt Schritt 1

5

Tighten this knot again. The first Double Half Hitch knot is finished.

Makramee Yogagurt Schritt 1

6

Now take the third cord from the left. Repeat steps 3 to 5 with this one.
Be careful not to pull the cord so tight that it slides all the way up. The aim is for the Double Half Hitch Knots to form a diagonal line.

Makramee Yogagurt Schritt 1

7

Now the second cord from the left. Repeat steps 3 to 5 with this one.
Now you can see the diagonal line better. It should look like this for you too. If not, undo the last knot and try again.

Makramee Yogagurt Schritt 1

8

And last but not least, add the first cord. Repeat steps 3 to 5 with this one.
When this is done, you can place the fifth cord from the left over the three behind.
Makramee Yogagurt Schritt 1

9

We now make the Double Half Hitch knot again with the last three cords. So take the sixth cord and place it over the diagonal one. Then thread it through from behind between the diagonal cord and itself.

Makramee Yogagurt Schritt 1

10

Tighten the knot and do exactly the same again with the same cord.

Makramee Yogagurt Schritt 1

11

Tighten the knot and the first Double Half Hitch knot on this side is finished.

Makramee Yogagurt Schritt 1

12

Repeat steps 9 to 11 with the second last cord.
Again, make sure that the row is diagonal and preferably as symmetrical as possible to the other row.

Makramee Yogagurt Schritt 1

13

Repeat steps 9 to 11 with the last cord.
The basic framework should now look like this.

Makramee Yogagurt Schritt 1

14

Now comes the square knot. You will need the four middle cords for this, with the middle two “just lying around”. Take the left cord, place it over the two middle ones and then under the right cord. Then take the right cord, place it behind the two middle cords and place it over the left cord from the back to the front.
Makramee Yogagurt Schritt 1

15

Tighten the knot and then place the right cord over the middle two and then behind the left cord. Then take the left cord, place it behind the two middle ones and pass it over the right cord from the back to the front.

Makramee Yogagurt Schritt 1

16

Tighten this knot too. If this was too quick for you, you will find detailed step-by-step instructions for the square knot in the knotting techniques.

Makramee Yogagurt Schritt 1

17

Now come the Double Half Hitch knots again. Place the first cord over the next three. The Double Half Hitch knots are now tied around the first one.

Makramee Yogagurt Schritt 1

18

Start with the second cord from the left. You now knot this cord in exactly the same way as the sixth cord in steps 9 to 11.

Makramee Yogagurt Schritt 1

19

Then do exactly the same with the third cord from the left. Again, tie the Double Half Hitch knot around the diagonal strand. Again, make sure that the row is diagonal.

Makramee Yogagurt Schritt 1

20

Repeat steps 9 to 11 with the fourth cord from the left.
Makramee Yogagurt Schritt 1

21

Now place the rightmost cord diagonally over all the other cords. Now tie the Double Half Hitch knot around the diagonal one with all seven remaining strands.

Makramee Yogagurt Schritt 1

22

So you start on the right and tie the Double Half Hitch knot one after the other. This means that you basically repeat steps 3 to 5 with each strand.
The diagonal line is also important here.
If you click on the pictures, you can also enlarge them.
Makramee Yogagurt Schritt 1

23

You already know everything that comes next, because the pattern is only repeated.
Place the fifth cord from the left over the last three cords. This corresponds to step 8.

Makramee Yogagurt Schritt 1

24

Now repeat steps 9 to 11 again with the back three cords.
Makramee Yogagurt Schritt 1

25

Now it’s time to tie the square knot again. You will need the four middle cords for this.
This corresponds to steps 14 to 16.

Makramee Yogagurt Schritt 1

26

Place the first cord over the next three. Use each of these to tie the Double Half Hitch knot around the diagonal one as in steps 18 and 19.

Makramee Yogagurt Schritt 1

27

Then take the last cord and place it diagonally over all the others. Again, make a Double Half Hitch knot with each one around the diagonal one.

Makramee Yogagurt Schritt 1

28

Lay the fifth cord diagonally over the last three.

Makramee Yogagurt Schritt 1

29

Tie with the last three a Double Half Hitch knot around the diagonal cord.

Makramee Yogagurt Schritt 1

30

Make another square knot with the middle four cords.

Makramee Yogagurt Schritt 1

31

Then place the leftmost cord diagonally over the following three cords.

Makramee Yogagurt Schritt 1

32

Tie three Double Half Hitch knots again.
When this is done, place the rightmost cord over the four neighboring cords (from the left, these are cords 4 to 7).
Makramee Yogagurt Schritt 1

33

Use these cords to tie another four Double Half Hitch knots around the diagonal cord.
Congratulations, the basic framework is complete!
Makramee Yogagurt Schritt 1

34

Now you need the short cords. You can shorten the cords of the basic framework to approx. 6 cm and then cut the remnants to size.
Take a short cord, double it and make a Lark’s Head Knot around the outer cord (see picture).

Makramee Yogagurt Schritt 1

35

Now do the same with the remaining 21 short cords. At the very top, add three short cords to the right and left edges. Add four to each of the other edges.
If there is more or less space, leave out a cord or add one.
Makramee Yogagurt Schritt 1

36

Comb the ends of the cords with a comb or fork so that they unravel.

Makramee Yogagurt Schritt 1

37

Cut the feather so that it creates a nice overall look. Done!

I hope you were able to follow the instructions well and had fun tying them. If you tie several feathers like this, you will find it easier each time. The Double Half Hitch knot in particular requires a bit of practice. If you have any questions or comments, please write in the comments, I look forward to hearing from you!

0 Comments

Submit a Comment

Your email address will not be published. Required fields are marked *